Forum Replies Created
-
AuthorPosts
-
 Kat FehrModerator
Good morning, Cathy,
Excellent question. We use PayPal to process the credit card payments, but you do not need a PayPal account to make purchases. When you check out you will be given 3 options for payment: You can use your PayPal account, you can use your PayPal later account, or you can just use a Credit Card.
Happy Shopping!
-Kat 🙂
Kat FehrModeratorHi, patterns that are Red, indicate that they have already been stitched.
Black patterns have not been stitched yet, and are able to be stitched.
Teal patterns are patterns that do not fit into the boundary space when using the e2e function. If your patterns are teal, they can not be stitched, and you’ll have to advance the quilt, and re-do the roll quilt function.
Hope this helps.
-Kat 🙂
Kat FehrModeratorHi Natalie..it sounds like you need to snap the nodes together. When you did Order Join, notice where the yellow stops. That’s the spot where you need to snap the nodes together. Press F7 on your keyboard to access the nodes. (Or you can select the pattern and right click on it, and access the Nodes that way too). Turn on Snaps – End Point (located at the bottom of your CAD screen) and then left click and drag on the pink endpoint node, and it will snap to the end point node in the next pattern segment.
Then re-do your order join (just to make sure they all turn yellow). And you should be all set.
Here is a link to one of our articles that might help you. https://knowledgebase.gammill.com/knowledge/order-join
– Kat 🙂
Kat FehrModeratorHi Mitzi, To import an image in CS to go File (in the menustrip), then click on import image. The software will prompt you to pick an image (you have to click to where you have it saved on your computer). You can import JPG, JPEG, PNG, BMP files.
Low res images work best, and you cannot rotate, resize or crop the image once in CS.
Here is a link to more info about how to import an image:
https://knowledgebase.gammill.com/knowledge/file-commands-image-file
Have fun!
-Kat 🙂
Kat FehrModeratorHi Gail,
Excellent question…let’s start with the wavy border first: whenever you use border corner you want to delete the Statler made boundary (select the boundary and then press delete on your keyboard) and then re-click out a new boundary using the machine head, so that it accurately reflects the pieced quilt. The Statler made boundary only has us click in 8 spots, so it is always going to perfectly square, but we know that not all of our quilt tops are perfectly square.
As for the margins, when you adjust the margins in the setup box, it adjusts both the inner and outer margin simultaneously. One way to adjust this is to click out your initial boundary 1/4″ in from the edge of the quilt (this will leave room for the binding).
And after you delete the Statler made boundary and click out a new one using the machine head that accurately reflect the quilt top piecing, you can use your handles to adjust the patterns more if desired.
Hope this helps! Let us know if you have further questions.
– Kat 🙂
Kat FehrModeratorHi Dan,
Below is the link to the bottom border set up video…you have two options, you can rubber stamp your top border and rotate it, and place it in the bottom. (Use your handles to make any necessary adjustments) Or you can re-do the border corner set up, BUT before you start clicking out the spots indicated on the CAD screen, took over at the set up box, there is an option for ‘bottom’. check that button and then you can click out the bottom bo
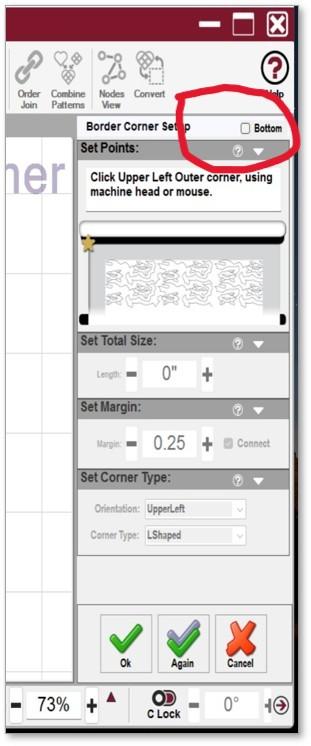 rder.
rder.https://knowledgebase.gammill.com/knowledge/border-corner
We don’t have a video on chunking, to chunk, draw a detailed boundary around the previously sewn side border section, then rubber stamp a new copy into the boundary. Double Triple Check with your crosshairs that everything lines up.

Have fun with your project!
-Kat 🙂
Kat FehrModeratorExcellent question….you can use either one….however you may want to lean towards fill for this one.
If you use Trim, then every time the pattern touches the trim box you will have a tie off…and this can be time consuming.
If you use Fill – the pattern will back track over itself along the edge of the boundary. This is faster, and the overstitching will be covered by the binding.
Remember that Trim = tie offs
Remember that Fill likes to travel = back stitching
Have fun!
-Kat 🙂
Kat FehrModeratorHi Celia,
It sounds like you might be accidentally missing a step in the <span style=”text-decoration: underline;”>roll quilt function</span>. Re-start quilting is used if you have a thread break, or if you stopped stitching for some other reason (mid-row)
When rolling the quilt follow the below steps:
- when your first row is done quilting, you pull up the bobbin thread and click continue.
- The first stitched row will turn red on your CAD screen.
- physically roll the quilt, make sure that when you roll, you leave enough room to see a bit of the last row sewn and can reach the last stitch of that previous row (ie: where you pulled up the bobbin thread).
- If you normally baste down the sides then do that now.
- Click on the<span style=”text-decoration: underline;”> roll quilt icon</span> in your toolstrip.
- Follow the instructions in the prompt box, which says: “have you rolled your quilt, and positioned your needle at the last sewn point?” You did just physically roll it, so at this point, simply move your machine head so that the needle is in the last spot stitched in the previous row, (ie: where you just pulled up the bobbin thread. ) Once the needle is there, click YES in the box on the screen that is asking you this question.
At this point the boundary should move on the CAD screen and the next row should turn black. If it does NOT, then roll the quilt up a bit more, and repeat clicking on the roll quilt function, move your machine head back to that last point again, and click yes.
If your row is still teal then take a look at your initial set up. When you initially set up your edge to edge make sure that you do not fill the entire quiltable space with only one pattern. If you accidentally do that, then you will not have enough room to fit the remaining pattern rows as you roll the quilt… and all the rows below the first one will remain teal.
I hope this helps…let us know if you have more questions about it.
-Kat 🙂
Here is the link to the roll quilt steps: https://gammill.com/topics/1027566/
Here is the link to the edge to edge steps in the New Owner Training: https://gammill.com/forums/topic/edge-to-edge/
Kat FehrModeratorHi Marcy,
I’m not sure what you mean by ‘voided areas’. You can always use draw trim to avoid stitching in certain areas. Remember that Trim = tie offs. And every time that the pattern ‘touches’ the yellow trim, you will have a tie off. You can also use Fill. Remember that Fill likes to travel…so depending on the pattern you may have lots of over stitching.
Here is a link to an article about Trim, it includes a video too: https://knowledgebase.gammill.com/knowledge/trim-inside-trim-outside
Here is a link to an article about Fill: https://knowledgebase.gammill.com/knowledge/fill-inside-fill-outside
Let us know if either of those articles help, and if you are still unsure, please further explain what you mean by voided areas, and let us know if you are using E2E or Repeat Patterns, or is this is in relation to a single block placement. So we can help you better 🙂
thanks,
Kat 🙂
Kat FehrModeratorHello…sorry for the delay, I accidentally missed this post.
Save the project in SAM onto a USB stick and then open that project on your Statler (in CS). You will then need to click out a boundary on the quilt top where you want the block pattern to go.
Next move the pattern into your boundary. Remember that the boundary itself, can not be stitched or moved. AND it will not stop the pattern from stitching outside of the boundary lines. The boundary is just a visual reference for you. Make sure your pattern fits in the space and double triple check with your crosshairs.
Next be sure that this block is the only black stitchable pattern on your CAD screen, and then click on start quilting.
Let us know if you have further questions 🙂
-Kat 🙂
Kat FehrModeratorYeah!! (sorry for the delayed response somehow I missed this!!! sorry!! )Unfortunately, we do not have directions on how to load Parrells. And I’m a PC person so I can’t answer that. However, you should feel free to ask us as many questions as you want. That’s how we all learn and it’s why this forum is here. We want you to be successful using your machine.
Have you gotten your retrofit yet? That’s very exciting!
You will be able to transfer your <span style=”text-decoration: underline;”>patterns</span> from the Statler to SAM on your mac laptop, via the PatternCloud™. Projects are not able to be transferred via the cloud, so those would need to be saved to a usb stick to be transferred. Does mac make an external drive with a USB stick option??
Here is a link to our article (with lots of photos) about the PatternCloud™
https://knowledgebase.gammill.com/knowledge/pattern-manager-quick-start
And please please please continue to ask as many questions as you want. (You should see how many questions I ask when I’m learning new things)
-Kat 🙂
Kat FehrModeratorHi Jennie! We’ve all run into that issue at some point. Try pinning the fabric down in halves.
For example, if the border 12″ long you would place pins: (I’m using 12″ just for easy math I’m sure your border is longer than that)
- beginning, a pin at 6″ and a pin at the end.
- Then while gently guiding the fabric with your hands, put another in at 2″ and one at 8″. This is forcing the fabric to stay in place.
- Next place a pin at 4″ and another at 8 .
Once all the pins are in place here is where I would normally use best press and then either let it dry or use a hair dryer to dry it (don’t plug the hair dryer in on the same wall/outlet as your machine as you can pop/blow a fuse on the controller…ask me how I know).
Sometimes I’ll use water instead…the point is to get the fabric wet, add heat so the excess shrinks, and stays in place because of the pins.
When spraying best press or water, try holding a piece of cardboard up like a shield to avoid getting the rest of the fabric wet and hopefully eliminate the fabric bleed. Once dry and shrunk down, baste along the bottom edge (and across the middle of the border etc. There is no wrong place to baste add as much or as little basting as you are comfortable with (don’t hit any pins).
Remove the pins, and slowly stitch so that you can guide the fabric as needed. (and of course you’ll have to remove any/all basting stitches once the quilt if finished)
- You mentioned that the fabric already bleed a bit, so you might not want to add more liquid. In that case, you can very carefully baste the section…(don’t hit any pins)….and just like we did with the pins, you want to baste down one direction, and then move the head a bit and baste back in the opposite direction, but off set the stitches (kind of like how bricks are offset). You can remove the pins as you go.
- Next quilt the pattern slowly so that you can guide the fabric to where you want it to go.
Here is a link to an article (with lots of photos) about basting a wonky quilt square. This example is more than just the bottom border, but it’s the same principal and it should help you.
https://knowledgebase.gammill.com/knowledge/basting-a-quilt-top-square
Good luck and let us know how it goes!
– Kat 🙂
-
This reply was modified 8 months, 2 weeks ago by Kat Fehr. Reason: forgot to click on notify me of replies
Kat FehrModeratorHi Peggy,
You can install CS on a Mac, however you will need to purchase and run the program Parallels in order to do so.
thanks,
Kat 🙂
Kat FehrModeratorHi Nancy,
That is an excellent question. Yes, you can buy patterns from other places. When you purchase a pattern, just choose the file format QLI and it will work perfectly with our machines 🙂
Have fun shopping!
-Kat 🙂
Kat FehrModeratorHi Jennie,
When using Minkie as the backing the most important thing is to NOT stretch it when loading it as a backing. If you stretch it then once you are done quilting and remove it from the frame it will ‘pucker up’ and shrink badly, taking the top with it. (I learned this one the hard way)
Here are a few links to some videos on our YouTube page that might help:
Have fun! And post a photo when you are done! Quilting always looks sooo great on Minky and I’d love to see what you create.
-Kat 🙂
-
AuthorPosts