Forum Replies Created
-
AuthorPosts
-
 Kathleen (Kat) FehrModerator
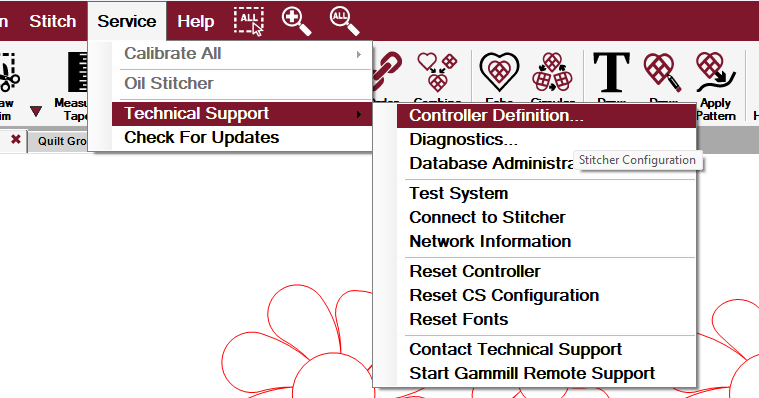
Hi Maria – you can change the default SPI under controller definitions. In the maroon menu bar at the top of CS click on Service then click on Technical Support, and lastly click on Controller Definitions. (I’ve included a photo below. Once you have Controller Definitions open, click on the box next to SPI, and change it to 12. Be sure to click on File-save and close…when closing the Controller Definitions box, otherwise your change won’t save. This should also solve your problem of the spi changing back to the default after each repeat.
Let us know if you have any other questions.
Have fun!
-Kat 🙂
Kathleen (Kat) FehrModeratorHi Jennie,
Excellent questions. Auditioning patterns will save you time once you start quilting, and it’s fun 🙂
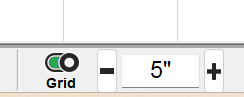
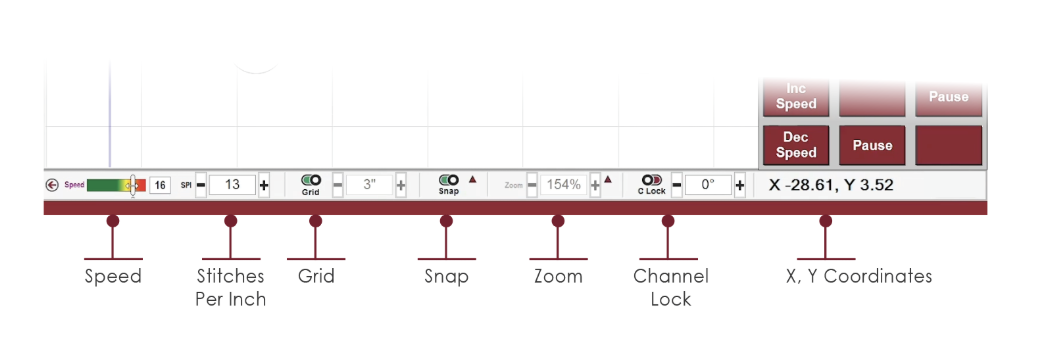
To draw a specific shape (to represent the border for example) you can first start by changing the size of the Grid (at the bottom of the CAD screen in the Status Bar. Using your example of 5″x30″, you could set your grid size at 5″ and then using Draw Boundary click out the 5″x30″ shape counting the grid squares. (You can also change the grid size when using Border Corner as well)
Here is a link to learn more about how Draw Boundary works: Draw Boundary
You can use Draw Boundary to create the template for your quilt and the borders/sashing. And then place the patterns into them to see if you like how they look.
Another option is to import an image of the quilt top into Creative Studio and then place patterns ontop of the image. Here is the link on how to do that: File Commands – Import Images
Let us know if you have further questions. Have fun!
– Kat 🙂
PS. If you’d like to walk through this one on one with a Gammill Educator you can book an Educator Consult. Here’s the link for more information about consults: Educator Consult | Gammill, Inc
Kathleen (Kat) FehrModeratorHi, your first step is to turn on the Nodes view (which can be done by pressing F7 on your keyboard). Once the nodes are on, find where you want to divide the pattern. You can only divide at the Pink Nodes. Hover your mouse over the pink node where you want to divide, and right click.
When you right click a little message window will pop up, it has the word ‘divide’ in it. Click on the word divide.The pattern will now be divided into two sections. You can click on any of the sections and delete them, you can also use the handles to move the sections around. Depending on the pattern, you may need to divide in multiple spots.
If you need additional assistance, let us know the name of the pattern and the designer. Or include a screenshot of the pattern with the nodes view on.
Thanks,
Kat 🙂
-
This reply was modified 11 months, 2 weeks ago by Kathleen (Kat) Fehr.
Kathleen (Kat) FehrModeratorWhopps sorry, I just realized that the link didn’t work.
Here is the link to more information about Fill: Fill Inside and Fill Outside
-Kat 🙂
Kathleen (Kat) FehrModeratorHi Wanda,
If you want to fill the pattern inside of the 12″ square, then you will perform the fill first, as fill works with boundaries. And then after you’ve done the fill, and you want the 12″ box to stitch, that is when you will convert the boundary to a black stitchable pattern.
Depending on shrinkage and if this is basted, or stitched in the ditch, or not, then when you stitch this out you may need to surf a bit to make sure that the 12″ square lines up with the fill pattern.
Here is a link to more information about using Fill. Fill Inside and Fill Outside (gammill.com)
Good luck! I’d love to see a photo of the completed block. 🙂
-Kat
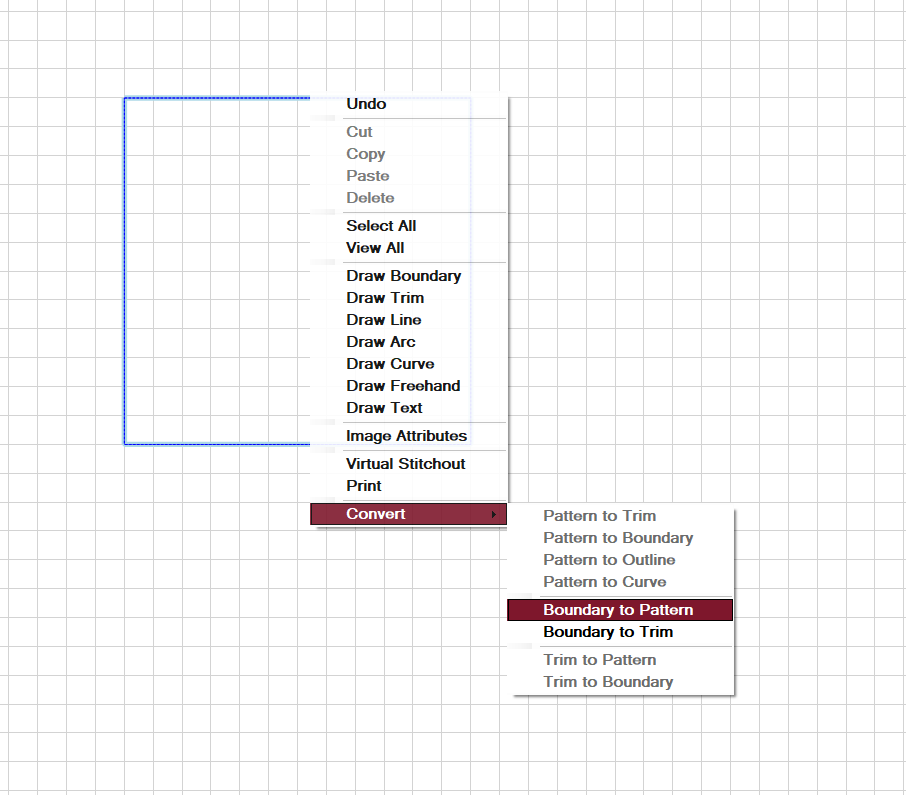
Kathleen (Kat) FehrModeratorHi Wanda – If I’m understanding correctly, you want to stitch out the 12″ square. In order to do that you will need to convert the 12″ boundary into a stitchable pattern. Boundaries are a visual reference for us. Boundaries cannot be moved; boundaries cannot be stitched.
Here are the steps to convert the boundary into a stitchable pattern:
- Select the boundary by single left clicking on it, it will turn a brighter blue. Then right click on the selected boundary and a popup menu will appear.
- At the bottom of the menu you will see the word “Convert”. Hover your mouse over the word convert, and another menu will appear with some additional options.
- Single-left click on the option that says “Boundary to Pattern”.
The 12″ square will now change from a blue boundary to a black stitchable pattern.
Let us know if you have further questions 🙂
Happy Quilting,
Kat 🙂
Kathleen (Kat) FehrModeratorHi Diana,
For your skipped stitches…
I’m wondering if there is stabilizer under the applique and if that’s what is causing the skipped stitches. Is it skipping in other areas too??
Check the following things:
#1 most common cause of skipped stitches is – The fabric layers are stretched too tightly on the frame. Be sure that your quilt sandwich isn’t too tight. And that the side clamps are also not pulling on the fabric. The side clamps are just to help keep the backing fabric from shifting, they should not be pulling on the back fabric tightly.#2 most common cause is- The needle size is too small. Are you using that 110/18/4.0 needle? Have you tried changing the needle? Sometimes the needles can be bent slightly (to slight for us to see) and that can affect your stitch quality. If there is stabilizer under the applique it’s possible that the needle got ‘gummed up too’ depending on what type of stabilizer it is.
Here are a couple of other things to check:
*Is your needle installed correctly. The belly bulge should face the front of the machine.
*Check your thread path. You might want to consider re-threading just to be sure. Pull out and replace the bobbin too (in case it wasn’t snapped in all the way)
*Check the bobbin area to ensure that it’s dust/lint free.
*make sure your take up bar isn’t too high or too low. You should be able to fit your hand in-between the take-up bar and the base of your machine. If there is too little space, the machine will drag along the bar. If there is too much space the quilting can get ‘bouncy’.Railroad issue: for the railroading try tightening the tension on the top thread. In addition to that you may want to try a thread net (only put it along the bottom of the thread cone and not over the entire cone of thread).
If that doesn’t work, check your bobbin, if the tension is too tight you can also get railroading on the back.
Start with the top tension (only change one thing at a time so that you know what the issue was).
Let us know if that helps.
-Kat 🙂Kathleen (Kat) FehrModeratorHey there Jen, yes you are correct, when purchasing a pattern from a 3rd party designer you want to buy the QLI format.
If you are buying a design from the PatternCloud™, it will automatically be the correct format.If you create and save your own pattern in CreativeStudio®, you will notice that it saves as a GQP format. Which stands for Gammill Quilting Pattern.
Let us know if you have further questions.
-Kat 🙂Kathleen (Kat) FehrModeratorHi Pam,
Sorry for the delayed response. Emails regarding posts/questions and answers in the forum only go out when/if someone posts something in the forum. It just happens that no-one has posted any questions in the Elevate forum for a while.
thanks,
KatKathleen (Kat) FehrModeratorHi Shelley,
Here are some tips…after you roll your quilt and you are chunking the borders draw a boundary in the new quiltable space where the side border is going to be.
As you click out around the bottom of the previous stitched border, be detailed. At this point the new boundary and the previously stitched patterns will not line up on your CAD screen because the quilt has been rolled.
Next, select the red previously stitched border patterns and move them up on your CAD screen (using the arrow keys on your keyboard) until they align with the newly drawn boundary. The bottom of the already sewn red pattern, should line up with the top of the new boundary.
Now move your unsewn border pattern up into the new boundary…line it up visually on your CAD screen. Then double triple check with your crosshairs that it lines up how you want it, and then stitch.
Let me know if this helps. 🙂
-Kat 🙂
July 24, 2024 at 4:16 pm in reply to: This is wrong #9 goes Clockwise and #0 goes counterclockwise #2047392Kathleen (Kat) FehrModeratorExcellent catch Shirley!! Thank you. We will get this updated 🙂
thanks,
Kat 🙂Kathleen (Kat) FehrModeratorHi…the draw trim function creates tie off’s, so it is supposed to stop at the ‘edge’ of the trim and prompt you to pull up the bobbin thread, and then you click continue for it to stitch the next section. Depending on your pattern, it could have a whole bunch of tie-offs.
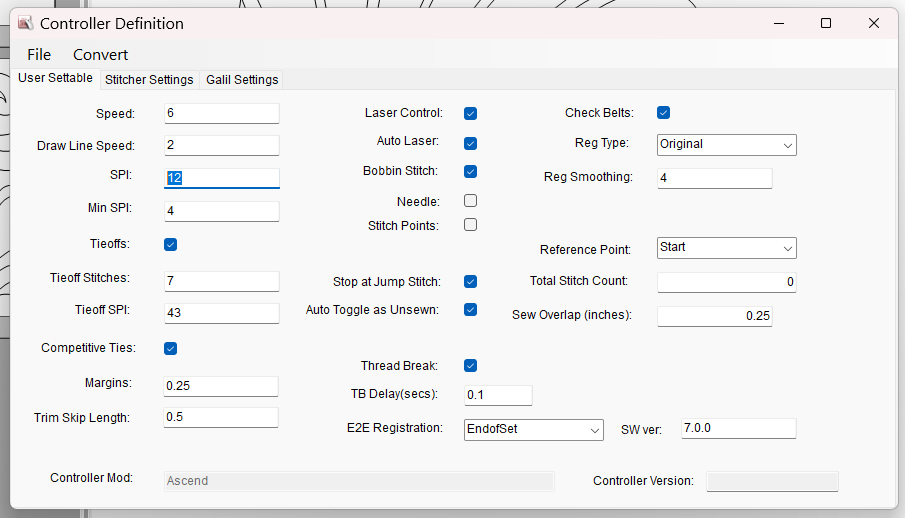
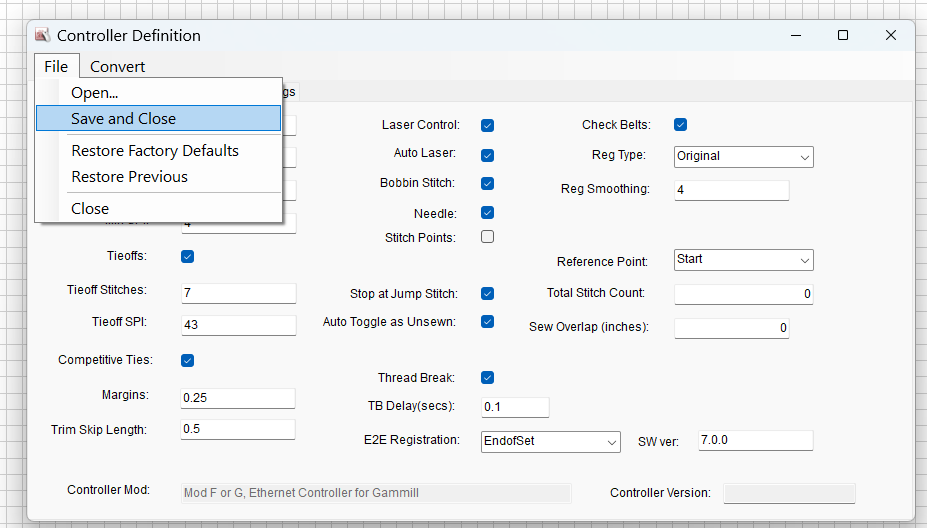
If you would like the machine just keep stitching, and not stop and do the tie-offs, then you can go into controller definitions (click on Service in the menustrip – then click technical support – then click controller definitions – and a new window will open up.) Inside the controller definitions window uncheck the blue box next to tie offs, and uncheck the blue box next to stop at jump stitch. Then click File-save & close.
Now the machine will just keep stitching, it will not stop at the jump stitches, and it will not prompt you to pull up the bobbin thread. It will however drag the thread with it, but if your trim is along the edge where the binding will cover it, then that will be fine.
When you are done stitching out the trim sections, remember to go back into controller definitions and re-check the boxes next to ‘tie offs’ and ‘stop at jump stitch’ so that the machine goes does your ties offs etc. going forward.
As for as the missing row…I’m going to suggest that you finish the quilt first, and then roll back to the empty row. On your cad screen click on the Draw Boundary icon, and using the machine head trace out the boundary of the empty row. Once you have the boundary in place, rubber stamp/copy paste (or just move) one of the completed rows into the new boundary. Toggle the row un-sewn and stitch it out. (double check your placement with the crosshairs first to make sure that it’s going to fit and not accidently stitch over the previously sewn rows on the quilt. You can always use your handles to adjust the pattern if need be.
I hope this helps! Let us know if you have further questions.
-Kat 🙂
Kathleen (Kat) FehrModeratorHi,
That is a very good question. You should have received a phone call from customer service after your machine was delivered. They call to check in to see how delivery went, and they usually schedule your free educator consultation at that time as well.If your consultation didn’t get booked yet, then please email: [email protected] and a team member will reach out and get you scheduled.
Have a great weekend, and let us know if you have further questions. 🙂
Thanks,
Kat 🙂Kathleen (Kat) FehrModeratorHi Wanda,
I’m just seeing this question now, I’m so sorry for the delay. I’m guessing you got it handled already. In the future, if items are grayed out, it usually means that you are still ‘in’ a function. Perhaps you needed to click continue on the keypad, or close out of roll quilt. Sometimes, just a simple left click on a blank spot on the CAD screen helps. Also, check the prompt box in the lower left-hand corner of your CAD screen. The prompt box will have a message that tells you what the software is doing and usually tells you what it’s waiting for to happen next.Again, I apologize for the late response, I’m so so sorry that I didn’t see this earlier.
-Kat 🙂
Kathleen (Kat) FehrModeratorHi Diana,
When wanting to maintain a pattern’s specific size, make adjustments to the pattern size first, then adjust repeats and rows (remember to set the lock). This ensures that the desired pattern size does not change.
If the Freeze Aspect box is checked, the size remains proportional, meaning any changes in the width or height of the pattern ensure the other dimension will be automatically adjusted. (it doesn’t keep the overall size from actually changing)
Changes made in Set Repeats and Rows maintain the pattern size and simply adds repeats of that size to create a row, increasing the total width. Increasing the number of rows will increase the total height.
Try setting up your quilt with the following steps:
*draw your boundary
*click on your pattern, then click on repeat patterns
*left-click once inside your boundary where you want the pattern to start (changing the point type to lower left if needed)
*change the pattern size to the size you want
*lock the lock in Set Repeats and Rows, and adjust the number of repeats and rows. As you do this the pattern size will stay the same, and you will notice the overall quilt size will be changing in the Set Total Size box.
*You might not be able to get your overall quilt size to be exact since you are working with a set size pattern, BUT that’s okay because you can keep adding repeats and rows until it is BIGGER than your quilt size…and then use either Fill or Trim on each row to make it fit. If you use Fill (you’ll want fill-inside for this) the travel lines will be on the edges and your binding will cover them up.Hope this helps. Have fun, and let me know if you would like a walk-through of the fill-inside function.
Happy Quilting!
– Kat 🙂 -
This reply was modified 11 months, 2 weeks ago by
-
AuthorPosts